 Save
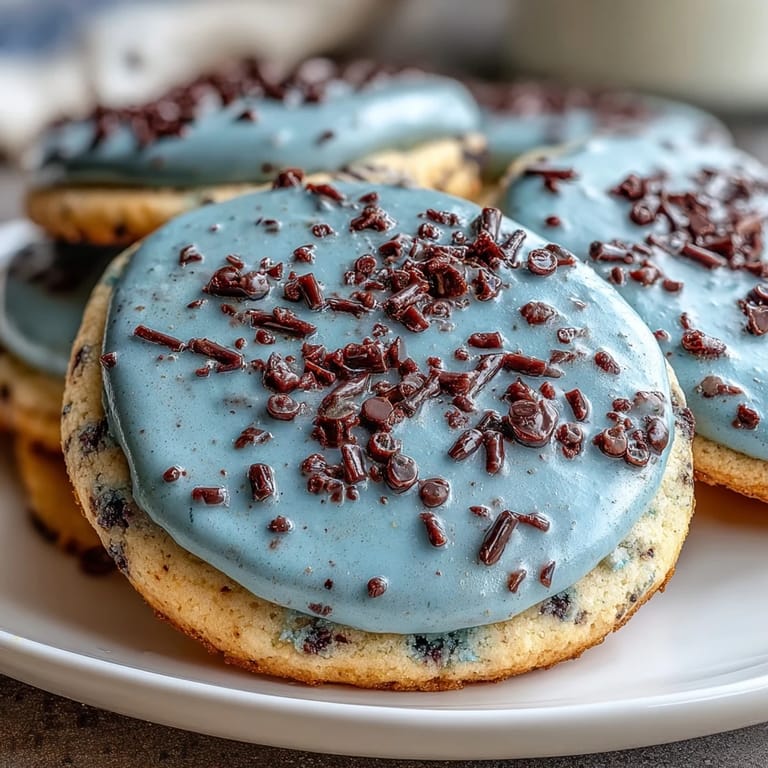
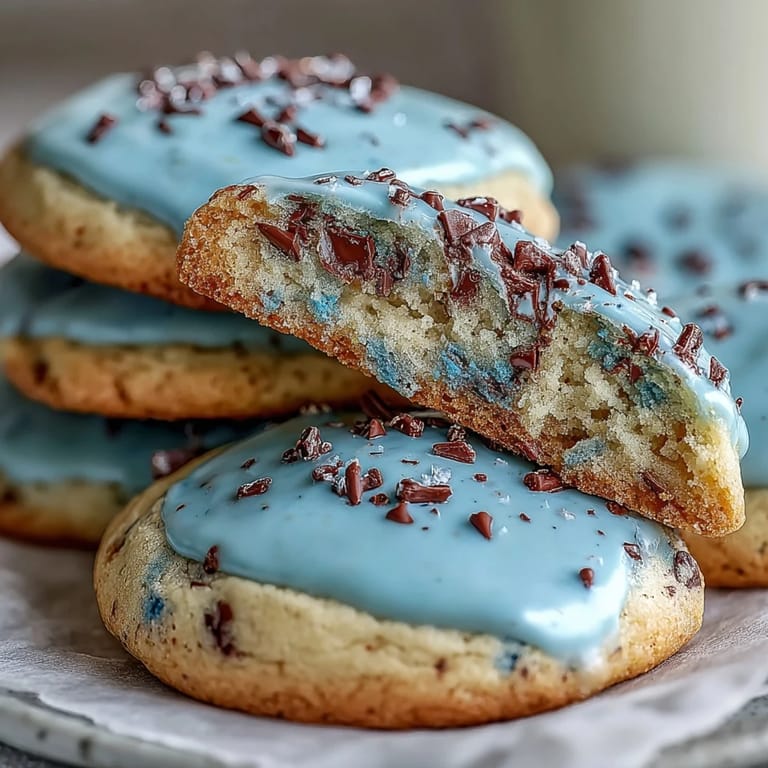
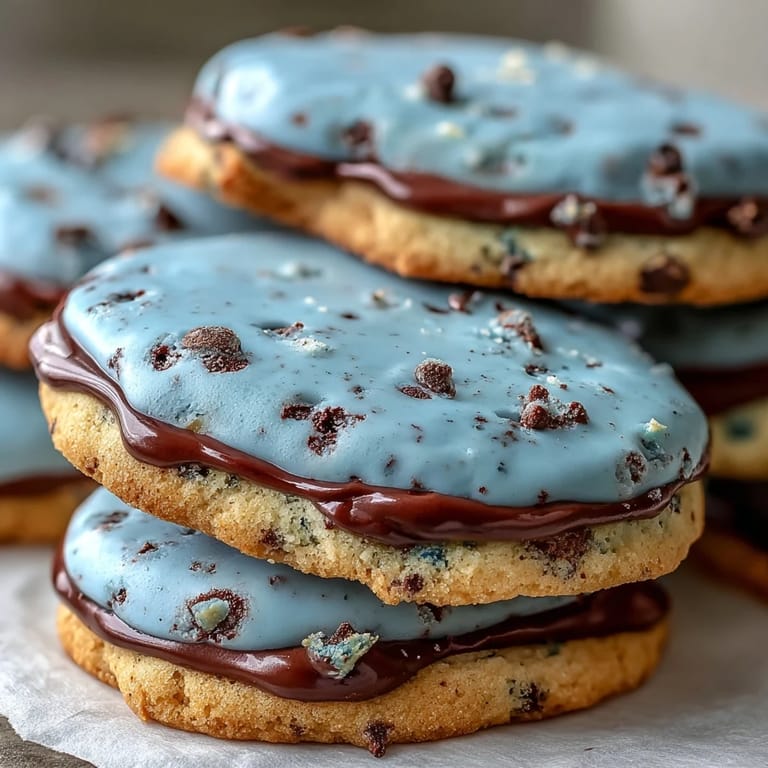
Save The first time I made these robin's egg cookies, my kitchen was filled with a springtime energy—the windows were open, birdsong was drifting in, and the idea of crafting dainty blue cookies felt both playful and soothing. The scent of vanilla and butter mingling as I creamed them together always brings a smile, but I'll admit, the speckling part was a total surprise: cocoa splatters ended up everywhere, including my elbows. Isn’t it funny how something so delicate-looking requires such a spirited mess? I wasn’t aiming for perfection, just the gentle anticipation of sharing something joyful. Now, whenever I whisk that royal icing, I remember how these cookies brought a hint of sunshine to an ordinary afternoon.
One chilly April, my niece tugged at my sleeve asking to help with baking – the kitchen turned into a busy workshop of hands rolling dough, laughter echoing as we debated whose speckles looked most like real eggs. She took her time piping blue icing, and I realized these cookies are really meant for sharing, especially when everyone joins in for the messy speckling finale. Decorating as a group made even the washing up feel celebratory. That afternoon, the cookies felt like tiny treasures tucked into the corner of a family memory. We still giggle about uneven speckles lining the tablecloth and our shoes!
Ingredients
- All-purpose flour: Gives the cookies structure—I found sifting beforehand helps avoid lumps.
- Baking powder: Makes the cookies tender without puffing them up too much.
- Fine salt: Balances the sweetness for a more nuanced flavor.
- Unsalted butter: Soften fully for smooth, creamy dough—let it reach room temperature for easy mixing.
- Granulated sugar: Creates those crisp edges and classic sweetness.
- Large egg: Binds the dough together; fresher eggs give a silkier texture.
- Pure vanilla extract: Adds depth—don't skimp on this!
- Almond extract (optional): A secret touch, just a drop, lifts the flavor and makes the aroma unforgettable.
- Blue gel food coloring: A few drops go a long way; avoid liquid coloring as it changes dough consistency.
- Powdered sugar (for icing): Sift before mixing for a perfectly smooth finish.
- Milk: Allows you to adjust icing texture—add it slowly.
- Light corn syrup: Makes icing glossy and sets beautifully.
- Cocoa powder: For speckling—use unsweetened for authentic color and taste.
- Food-safe paintbrush: Essential for those charming egg-like speckles—test flicking technique before decorating cookies.
Tired of Takeout? 🥡
Get 10 meals you can make faster than delivery arrives. Seriously.
One email. No spam. Unsubscribe anytime.
Instructions
- Mix Your Dry Ingredients:
- Whisk together the flour, baking powder, and salt; the uniform powdery blend feels satisfying, and avoids surprise lumps later.
- Cream the Butter and Sugar:
- Beat butter and sugar until airy and pale; the smell turns buttery-sweet, filling the room.
- Add Egg and Flavor:
- Pour in the egg, vanilla, and almond extract; watching the mixture turn silky is oddly mesmerizing, so don't rush.
- Combine Dough and Color:
- Gradually fold in the dry mix and tint the dough a gentle robin's egg blue; be gentle to keep everything tender.
- Chill and Shape:
- Press into discs, wrap, and chill; the dough firms up and rolls easily after resting.
- Roll, Cut, and Bake:
- Roll to 1/4 inch and cut into egg shapes—bake until edges are just set; the light golden scent signals readiness.
- Blend Royal Icing:
- Mix icing ingredients until silky smooth and tint blue; the glossy finish is always satisfying to touch.
- Decorate Cookies:
- Apply icing and let it set; then prep for speckling, getting ready for a bit of cocoa chaos.
- Speckle with Chocolate:
- Mix cocoa and water, dip brush, and flick over cookies—cover everything nearby, trust me.
- Let Everything Dry:
- Let cookies dry completely before stacking or serving, patience rewards you here.
 Save
Save During our last spring gathering, these cookies became more than a bite—they were symbols of the season, nestling in baskets between dyed eggs and tulips. I caught my sister in a rare moment of quiet, admiring their pastel hues before sneaking the very first one.
Speckling Secrets: Getting It Just Right
The trickiest part is definitely the speckle—an old toothbrush or stiff paintbrush gives just the right flecks, but always cover your workspace. I learned early that aiming for random is best: perfect dots look too artificial, but scattered, messy cocoa spots invite the eye and make each cookie unique. Practice flicking on wax paper before tackling the real batch so you know how much pressure creates the look. It's messier than it seems, but worth every giggle when you get a beautiful robin's egg effect. If you go overboard, a second layer of icing helps hide wild speckles!
Making Icing with Kids (and Chaos)
Letting kids help whip up royal icing makes it extra special—everyone marvels at the transformation from powdery sugar to shiny blue glaze. I found letting each person tint their own batch brings a range of robin's egg shades that look gorgeous together. When piping, sometimes we swap spatulas for spoons and just swirl icing across cookies—no pressure for precision. Setting up a drying rack and watching cookies harden is oddly calming after all that activity. Cleanup feels less daunting when the reward is sweet, blue-flecked cookies.
Rolling and Cutting Tips for Beginners
Flour your surface well and roll gently so dough stays smooth—I always rotate the disc to avoid sticking. Press cutters straight down (no twisting) for sharp shapes, and gather scraps for a second roll without overworking. If you doubt your shape, egg-shaped cookies are forgiving—slightly uneven edges still bake up adorable. Keeping parchment between layers prevents smudging if you stack raw cutouts. Sprinkle a little extra flour before moving shapes if you're working with helpers.
- A quick chill after cutting keeps the cookies from spreading.
- Keep a damp towel nearby—sticky fingers happen fast!
- If you lose count, bake the imperfect ones anyway—they'll taste just as good.
 Save
Save Each time I pull these robin's egg cookies from the oven, I'm reminded how spring can be celebrated in tiny, colorful bites. Don't stress about perfection—the best moments (and cookies) are made with laughter and a dusting of cocoa on the floor.
Recipe FAQs
- → How do I achieve the pale blue color?
Add drops of blue gel food coloring to the dough and icing, mixing gently until the desired shade is reached.
- → What is the speckling technique?
Mix cocoa powder, water, and vanilla, then flick a paintbrush or toothbrush over iced cookies to create chocolate speckles.
- → Can almond extract be left out?
Yes, almond extract is optional. Omit it for a classic vanilla-flavored cookie.
- → How should these cookies be stored?
Keep cookies in an airtight container at room temperature for up to one week to maintain freshness.
- → What tools are needed for decorating?
Use cookie cutters, piping bags or spatulas, and a clean paintbrush for speckling the cookies with cocoa mixture.
- → What cookie shapes work best?
Egg or oval shapes are ideal, but round cutters can also be used for a simple option.