 Save
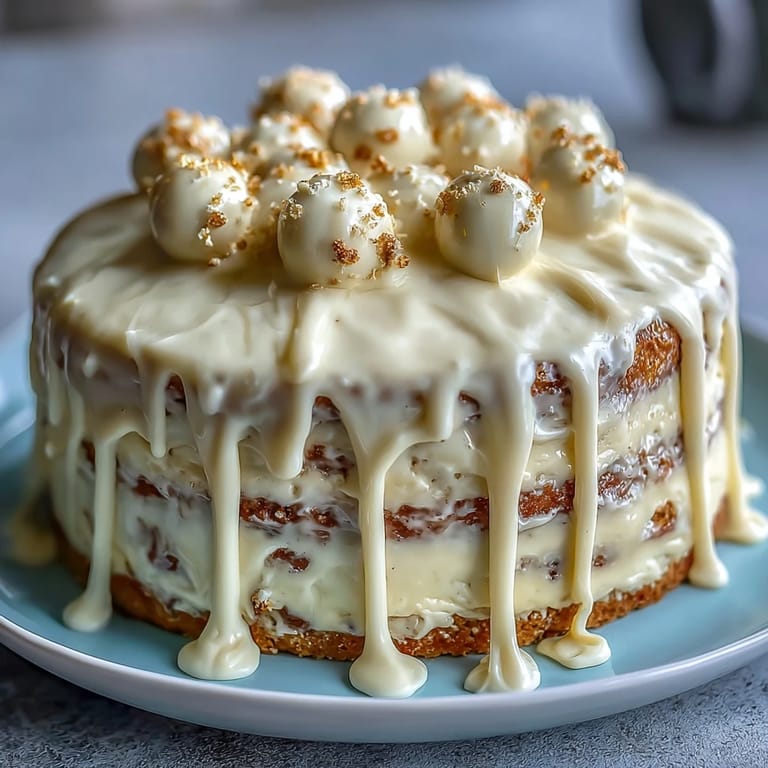
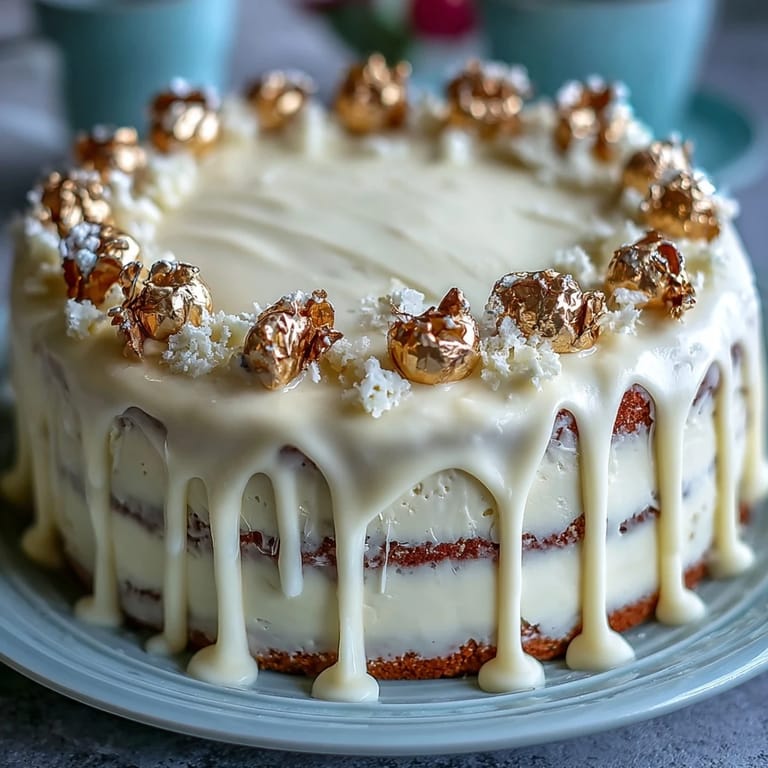
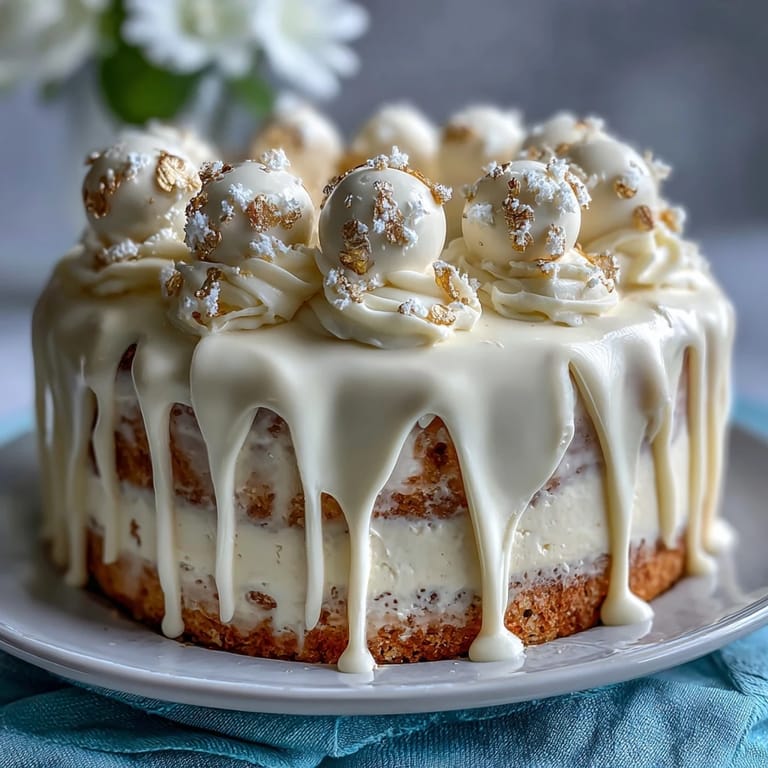
Save There's something about baking a cake for someone's graduation that feels different from other celebrations—it's not just dessert, it's a edible congratulations, a sweet punctuation mark on years of hard work. The first time I made this white chocolate drip cake, I was nervous my hands would shake too much while piping the ganache, but instead I found myself falling into a rhythm, drizzle by drizzle, watching the white chocolate cascade like a waterfall. My friend walked into the kitchen mid-decorating and gasped at the gold balloons catching the light, and suddenly it wasn't about my worries anymore—it was about the magic of creating something beautiful for someone you're proud of.
I'll never forget watching my college roommate's mom take the first bite at the graduation party—she closed her eyes like she was tasting something sacred, then asked for the recipe before I'd even finished cutting the second slice. That moment taught me that celebration cakes aren't really about impressing people with difficulty; they're about giving someone a reason to pause and savor the occasion.
Ingredients
- All-purpose flour (2 ½ cups): The foundation of a tender crumb; measure by spooning into your measuring cup rather than scooping, which compacts the flour and makes the cake dense.
- Baking powder (2 ½ tsp): This is your lift—use fresh baking powder (check the date) because stale powder won't give you those delicate, airy layers.
- Unsalted butter (1 cup plus 1 cup): Room temperature is non-negotiable; cold butter refuses to cream properly, and your buttercream will look grainy instead of silky.
- Granulated sugar (2 cups): The beating with butter isn't just mixing—it's creating tiny air pockets that make the cake rise and stay moist.
- Eggs (4 large): Room temperature so they incorporate smoothly without shocking the batter; cold eggs create lumps.
- Pure vanilla extract (1 tsp plus 1 tsp): Don't skip the "pure"—imitation extract tastes tinny against the delicate white chocolate.
- Whole milk (1 cup): Room temperature milk combines with the flour gradually, preventing lumps and ensuring even hydration throughout the batter.
- Powdered sugar (4 cups): Sift it before measuring to avoid a gritty buttercream that feels like biting into sand.
- White chocolate (6 oz plus 6 oz): Quality matters here—cheap white chocolate tastes waxy; look for real cocoa butter in the ingredients list.
- Heavy cream (2–3 tbsp plus ¼ cup): The small amount in buttercream keeps it spreadable; the larger amount transforms white chocolate into a silky drip.
- White chocolate crispy pearls or malt balls: These become your edible "balloons" and add a whimsical texture contrast to the soft cake.
- Edible gold spray or luster powder: The finishing touch that transforms simple candies into celebration-worthy decorations.
Tired of Takeout? 🥡
Get 10 meals you can make faster than delivery arrives. Seriously.
One email. No spam. Unsubscribe anytime.
Instructions
- Heat your oven and prep your pans:
- Set the oven to 350°F (175°C) and grease three 8-inch round pans, lining the bottoms with parchment paper so your cake layers slip out effortlessly. This step takes two minutes but saves you from scraping cake off metal later.
- Combine your dry ingredients:
- In a medium bowl, whisk flour, baking powder, and salt together, making sure there are no hidden pockets of baking powder that could create bitter spots in the finished cake. This mixture is your insurance policy against dense cake.
- Cream the butter and sugar:
- Beat softened butter and sugar in a large bowl for about three minutes until it looks pale and fluffy, like clouds—this aeration is what gives the cake its tender structure. You should be able to rub a bit between your fingers and feel how light it's become.
- Add eggs and vanilla slowly:
- Drop in one egg at a time, beating after each addition so it fully incorporates before the next one arrives; this prevents the batter from looking curdled and lumpy. The mixture should look smooth and glossy between each egg.
- Alternate flour and milk gently:
- Starting and ending with the flour mixture, add them in alternating amounts on low speed, mixing just until combined after each addition. Overmixing here develops gluten, which hardens the cake, so stop as soon as you don't see streaks of flour.
- Divide and bake:
- Distribute batter evenly among the three pans, smooth the tops, and bake for 30–35 minutes until a toothpick inserted in the center comes out clean. The kitchen will smell like pure vanilla—this is the moment you know you're doing something right.
- Cool with patience:
- Let cakes rest in their pans for ten minutes so they firm up enough to turn out without breaking, then cool completely on wire racks before touching them further. Rushing this step leads to a warm, fragile cake that falls apart during assembly.
- Beat buttercream to silk:
- Cream softened butter until smooth, gradually add sifted powdered sugar while mixing, then pour in the melted white chocolate, vanilla, and salt. Beat on high for a minute or two to incorporate air, which makes it lighter and easier to spread.
- Build your cake layers:
- Level the cake layers if the tops domed, place the first layer on your serving plate, spread buttercream on top, and repeat with the remaining layers. A thin crumb coat (a layer so thin you can see cake through it) catches the crumbs, then chill for thirty minutes before the final thick coat.
- Smooth the final frosting:
- Apply a thick coat of buttercream to the outside of the cake, smoothing the sides and top with an offset spatula dipped in warm water. Take your time here—imperfections actually add character.
- Create the white chocolate drip:
- Heat heavy cream until just steaming, pour it over chopped white chocolate, wait one minute for the heat to soften the chocolate, then stir until completely smooth and glossy. Let this ganache cool to room temperature so it's pourable but not scorching hot.
- Drip with confidence:
- Using a spoon or squeeze bottle, drizzle the white chocolate ganache around the top edge of the cake, letting gravity pull it down the sides in natural-looking cascades. Fill the center with ganache and smooth it with a spatula for a polished, intentional look.
- Prepare the gold balloons:
- Spray the white chocolate pearls or malt balls with edible gold spray in a well-ventilated area, or toss them in luster powder for a more subtle shimmer. Let them dry completely before inserting toothpicks or thin cake wires so they don't stick to the frosting.
- Arrange and chill:
- Insert the "balloon" toothpicks into the top of the cake in a festive cluster, chill until serving time, then bring to room temperature before slicing so the flavors open up. Cold cake tastes muted; room-temperature cake tastes like celebration.
 Save
Save The real magic happened when my friend's little sister, who'd been skeptical about cake her whole life, took one bite and asked why all cakes weren't this beautiful and delicate. That's when I understood that this cake isn't just about graduation—it's about creating a moment where someone feels genuinely celebrated.
Why White Chocolate Works Here
White chocolate has a reputation for being too sweet and cloying, but when you use quality white chocolate and pair it with a delicate vanilla sponge, it becomes something entirely different—it's creamy, sophisticated, and somehow feels lighter than you'd expect. The buttercream becomes spreadable luxuriance, and the ganache drip adds visual drama that makes people think you've trained in a professional pastry kitchen. I learned this the hard way after making white chocolate frosting with cheap chocolate chips and wondering why it tasted like sweetened plastic.
The Science Behind the Drip
The white chocolate drip works because of a precise balance between chocolate and cream—too much cream and it runs off the cake like water, too little and it sits there like concrete. When you heat the cream until it's steaming and pour it over chopped chocolate, the heat gently melts the chocolate while the cream creates a pourable consistency. The waiting room-temperature step is crucial because hot ganache runs everywhere, but it needs to be warm enough to flow, which is why I've learned to test the consistency by letting a small amount drip before committing to the whole cake.
Making It Celebration-Ready
The gold balloons are what transform this from a beautiful cake into a graduation cake—they're your permission to be playful and festive without looking over-the-top. I once made this for a promotion party and skipped the balloons thinking they were too much, and the cake looked lovely but felt incomplete, like a sentence without an exclamation point. The second time I added them, someone took a picture before we even cut into the cake, which told me everything I needed to know about what makes celebration food feel special.
- If you can't find white chocolate crispy pearls, malt balls work beautifully and add a subtle crunch and chocolate element that plays well with the white chocolate.
- Edible gold spray needs to be applied in a well-ventilated area away from food prep, so do this step outside or in a separate room before bringing the decorated pieces to your cake.
- The toothpicks or cake wires should be inserted just before serving to prevent them from absorbing moisture and becoming sticky.
 Save
Save This cake has become my go-to for anyone marking a milestone, because it's elegant enough to feel special but achievable enough that you won't spend all night stressed about execution. Bring it to room temperature, slice it with a warm knife between each cut, and watch people's faces as they taste it.
Recipe FAQs
- → How do I achieve a smooth white chocolate buttercream?
Beat softened butter until smooth, then gradually add sifted powdered sugar. Incorporate melted white chocolate and cream slowly for a silky texture.
- → What’s the best way to create the white chocolate drip effect?
Heat cream until simmering, pour over chopped white chocolate, stir until smooth, and cool before dripping over chilled cake edges.
- → How can I make edible gold balloons for decorating?
Spray white chocolate crisps with edible gold spray or roll them in edible gold dust, then attach to toothpicks or wires and arrange atop the cake.
- → Can I prepare this cake in advance?
Yes, refrigerate up to 3 days. Bring to room temperature before slicing and serving for the best texture and flavor.
- → What can I serve alongside this dessert?
Pair with sparkling wine or a festive cocktail to complement the vanilla and white chocolate flavors.