 Save
Save The first time I made chicken sushi bake, I wasn't trying to reinvent anything—I just wanted sushi flavors without the rolling. My roommate had leftover rotisserie chicken, I had rice in the pantry, and somehow we ended up with a golden, bubbling casserole that people kept coming back for. It surprised me how a simple idea could turn into something that felt both comforting and adventurous at the same time.
I made this for a potluck once when I was running late, and I remember pulling it out of the oven just as everyone arrived—the kitchen smelled incredible, all savory and garlicky-sesame. A friend asked if I'd been cooking all day, and I couldn't help but grin when I told them it took less than an hour from start to table. That's when I realized this recipe was special: it looks like you've put in serious effort, but it's genuinely forgiving.
Ingredients
- Sushi rice (2 cups): Rinse it really well—this removes excess starch and keeps the texture light instead of gluey, which honestly makes all the difference.
- Rice vinegar, sugar, and salt: These three together are what make the rice taste like sushi rice; don't skip seasoning the rice itself or the whole dish loses its soul.
- Cooked chicken breast (2 cups, shredded or diced): Rotisserie chicken works perfectly here and saves you time, plus it has more flavor than plain boiled chicken.
- Kewpie mayonnaise (1/2 cup): If you can find Japanese Kewpie, use it—it's creamier and slightly sweeter than regular mayo, and it's honestly worth the hunt.
- Cream cheese (2 tbsp, softened): This adds richness to the chicken mixture without making it heavy; just let it sit at room temperature so it blends smoothly.
- Sriracha and soy sauce: These are your flavor anchors; taste as you go because both can be adjusted depending on how spicy or salty you like things.
- Green onions (2, thinly sliced): They add brightness and a gentle onion bite that keeps the casserole from feeling one-dimensional.
- Shredded mozzarella cheese (1 cup): This melts beautifully and gets slightly crispy on top, creating pockets of golden texture throughout.
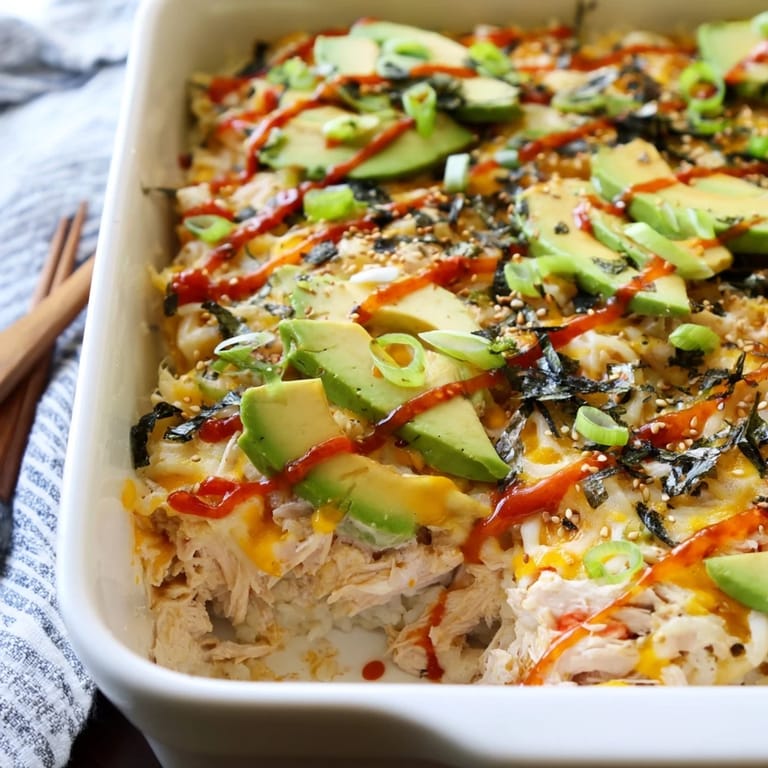
- Furikake seasoning (2 tbsp): This Japanese seasoning blend with nori, sesame, and bonito flakes is the secret to that authentic sushi-bake flavor—sprinkle it twice, once on the rice and once with the cheese.
- Fresh avocado (1), sliced: Add this only after baking so it stays soft and creamy; if you bake it, it gets bitter and weird.
- Nori sheets (1 sheet, cut into strips): The final touch of umami and crunch; tear or cut it just before serving so it doesn't get soggy.
- Toasted sesame seeds (1 tbsp): These add a nutty crunch and that final sushi-shop authenticity.
Tired of Takeout? 🥡
Get 10 meals you can make faster than delivery arrives. Seriously.
One email. No spam. Unsubscribe anytime.
Instructions
- Prep your station and rice:
- Preheat your oven to 400°F and get a 9x9-inch baking dish lightly greased. Rinse your sushi rice under cold water, stirring gently with your fingers until the water runs clear—this step sounds fussy but it's why the rice won't turn into mush.
- Cook the rice perfectly:
- Add the rinsed rice to a pot with 2 1/2 cups of water, bring it to a boil, then cover and lower the heat to a simmer for 15 minutes. Let it sit covered for another 10 minutes off the heat—this resting time is when the magic happens and the rice becomes fluffy and separate.
- Season the rice like you mean it:
- While the rice rests, mix rice vinegar, sugar, and salt in a small bowl until the sugar and salt fully dissolve. Fold this gently into the warm rice using a spatula, moving from the edges toward the center so every grain gets coated without getting crushed.
- Build your chicken layer:
- In a medium bowl, combine your cooked chicken, Kewpie mayo, softened cream cheese, sriracha, soy sauce, and sliced green onions. Mix until it's creamy and well combined, and taste it—this is your moment to adjust the heat level if you prefer it spicier or milder.
- Layer like you're building something beautiful:
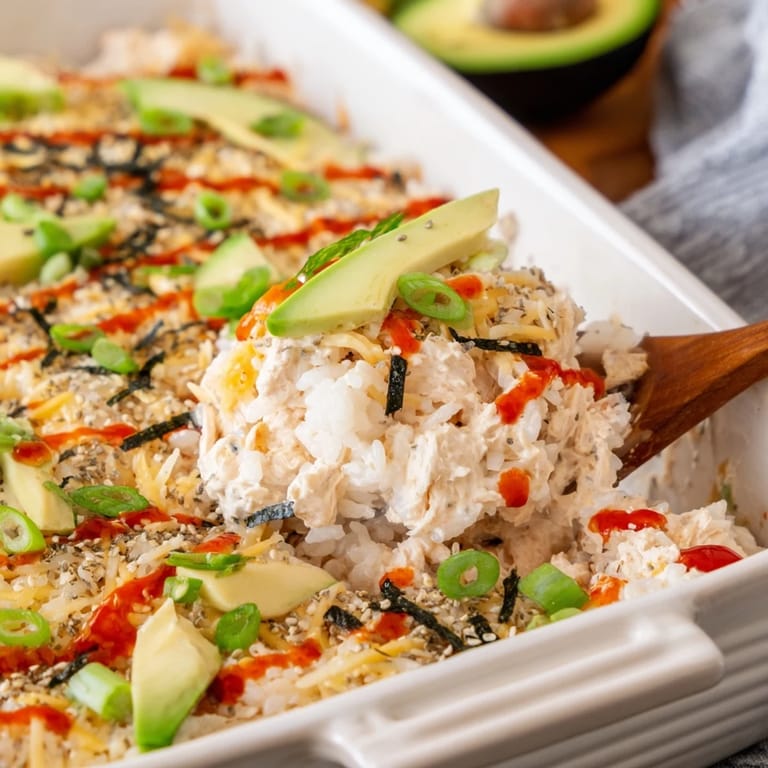
- Spread the seasoned rice evenly across your baking dish, then sprinkle 1 tablespoon of furikake over the rice. Layer the chicken mixture evenly on top, then sprinkle the shredded mozzarella and remaining furikake over everything.
- Bake until golden:
- Bake for 20 to 25 minutes until the cheese is melted and starting to turn golden at the edges. You'll know it's done when you lift the baking dish and the edges have that slight crispness that happens when cheese meets high heat.
- Finish with fresh toppings:
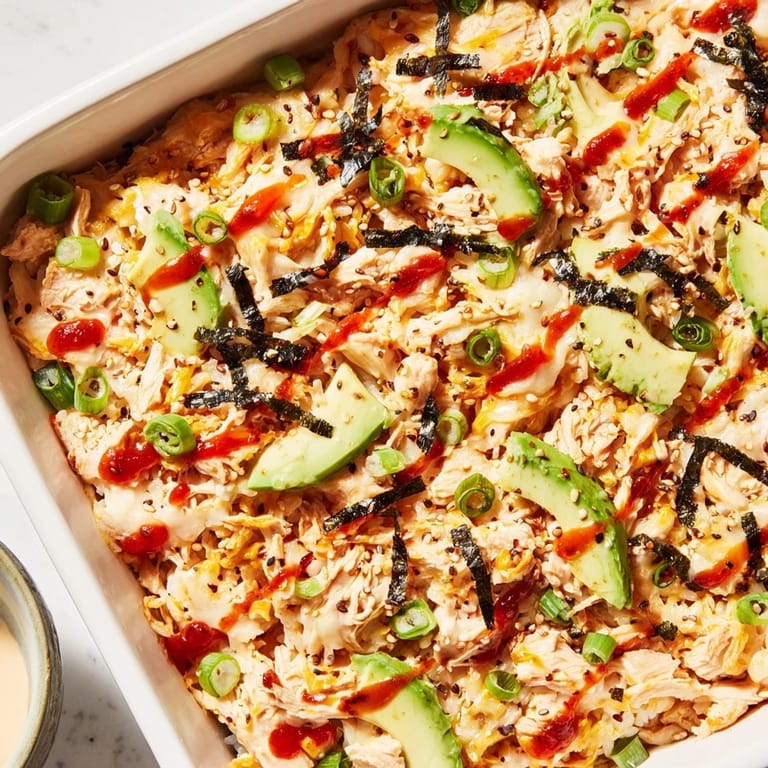
- Remove from the oven and let it cool for 5 minutes—this cooling moment lets the rice set slightly so it holds together when you scoop it. Top with sliced avocado, nori strips, toasted sesame seeds, and drizzle with a little extra sriracha and mayo if you want that extra richness.
- Serve and enjoy:
- Scoop portions onto plates or let people eat it straight from nori sheets if you want that fun handheld vibe.
 Save
Save There's something really satisfying about watching people dig into this casserole—it's colorful, it smells amazing, and everyone gets a little moment of surprise when they realize how sushi-like it actually tastes. That's when you realize a recipe isn't just about feeding people; it's about giving them an experience that feels a bit more thoughtful than what they expected.
Why Rotisserie Chicken Changes Everything
I used to poach chicken breast for this until a friend suggested rotisserie chicken, and I honestly felt foolish for not thinking of it sooner. The rotisserie chicken has this deep, savory flavor from being slow-roasted that boiled chicken just can't match, and it shreds beautifully without any effort on your part. Plus, if you're already short on time, buying pre-cooked chicken means you're genuinely done with the hardest part before you even start.
The Avocado Question
Avocado timing is the thing I see people mess up the most, and honestly, I did it myself once by adding it before baking. The heat turns it brown and weirdly bitter, and no amount of mayo can fix it. If you're prepping ahead, slice the avocado right before serving, or keep it completely separate and let people add their own—this way it stays that perfect creamy green and tastes like actual avocado instead of a sad shadow of itself.
Making It Your Own
The beauty of this dish is how flexible it is once you understand the core idea. I've made it with diced cucumber mixed into the chicken layer for extra freshness, added pickled ginger for brightness, and even snuck in some crab for a different vibe. The framework stays the same, but you get to play with it and make it feel like yours. Some people add spicy mayo drizzle before baking, others layer cream cheese on the rice itself—whatever speaks to your palate is the right call.
- Keep furikake in your pantry at all times because it transforms ordinary rice into something that tastes restaurant-quality.
- If you're making this for someone with dietary concerns, swap the mayo for Japanese Kewpie eggless mayo or use a dairy-free alternative for the cheese and cream cheese.
- This reheats beautifully in a 350°F oven for about 10 minutes, making it perfect for batch cooking if you're meal-prepping for the week.
 Save
Save This recipe taught me that fusion cooking isn't about trying to be fancy—it's about taking things you love and bringing them together in a way that feels natural. Every time I make it, someone asks for the recipe, and I love that it's become the thing people request when they know I'm cooking.
Recipe FAQs
- → What type of rice is best for this dish?
Sushi rice is ideal as it cooks to a sticky yet tender texture, perfect for absorbing the vinegar seasoning and holding the layers together.
- → Can I use pre-cooked chicken for convenience?
Yes, shredded rotisserie chicken works well and adds extra flavor while saving preparation time.
- → How spicy is this casserole?
The heat level depends on the amount of sriracha used; you can adjust it to your preference or omit it for a milder dish.
- → What is the role of furikake in this dish?
Furikake adds a savory, umami-rich seasoning with hints of seaweed and sesame, enhancing the rice layer’s flavor profile.
- → How should leftovers be stored and reheated?
Store leftovers in an airtight container in the refrigerator and reheat in the oven or microwave until warmed through.